A belt conveyor is a moving surface used to transport product from one end to the other. In its basic form it consists of a driving head pulley, a tail pulley, the moving belt, support rollers, cleaning devices, tensioning mechanisms and a structural frame. Though simple in concept its many components need to work together as a system to get the best performance and operating life. Critical to that is an understanding of how to care for a belt conveyor and tune it for successful operation.
Keywords: materials handling, bulk material transport
Belt conveyors are used to transport anything from matches to bulk material such as iron ore and quarried stone. The belt can be made of natural fibres, rubber, plastic or metal. Regardless of its construction and purpose there are basic requirements to its successful operation that must be met.
How a Belt Conveyor Works
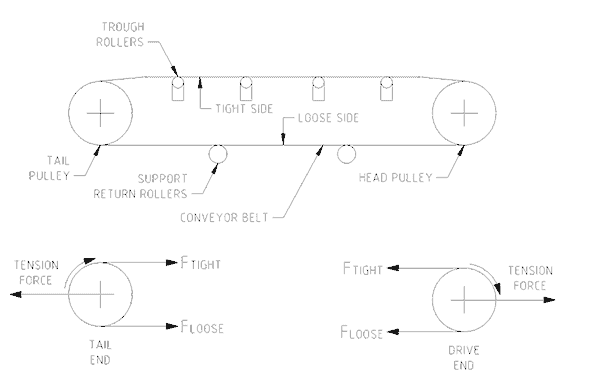
Figure No 1 is a simple sketch of a belt conveyor. An electric motor and gearbox turn the head drum (or head pulley). The belt is pulled tight to produce friction between it and the head drum. The friction overcomes the load and drag forces and the belt moves around the circuit from the head pulley to the tail pulley and back to the head pulley.

Only friction is used to drive the belt. If the friction falls the belt will slip or stop moving even though the head pulley keeps turning. The friction between the belt and pulley depends on the friction properties of the surfaces in contact, the amount of surface in contact (the arc and width in contact) and the tension in the two lengths of the belt.
The loaded side of the belt is the tight side and the return side is the loose side. The tight side needs to carry as much tension as possible to minimise the load on the drums, the shafts and the bearings. Getting the maximum friction possible between belt and head pulley does this.
Often a head pulley will be herringbone grooved or coated in rubber (or other such treatment) to increase the friction. Another option is to increase the arc of contact. A jockey (snubber) pulley is placed under the slack side close to the drum. By lifting the return belt higher so it comes off the head pulley further around the circumference the contact area and hence the friction is increased.
Tensioning the belt also increases friction. This can be by jacking the head and tail pulleys further apart and forcing the belt harder against the drums or by making the slack (loose) side tighter. Tightening the slack side goes against the ideal of keeping the slack side tension low and the tight side tension high. If the loose side is used for tensioning, the load carrying components are made larger to take greater forces.
Maximising Belt Conveyor Operating Life
Once a belt conveyor is designed and installed it is there for years to come! The very best practice to adopt to promote long, trouble-free life is to be sure that the designer has designed it with quality components that can handle the entire range of forces generated in its use. One way to insure that is to engineer every part taking a load and then review the design calculations and the component selection using independent, experienced equipment users and maintainers querying the designer for the assumptions, reasons and proof behind each design selection.
The list below highlights some of the issues and problems with belt conveyor installations. Once you are aware of them you can be on the watch-out and get to them fast.
- Belt wear and gouging from product impact at loading zones, from belt drag across solid surfaces, from scrapper rubbing, from the belt touching caught product, from product hardening on scrappers, from drive pulleys slipping during start-up or during a belt jam, from product build-up on trough and return rollers.
- Frayed belt at edges due to rubbing against structures, due to rubbing against product caught in structures, from rubbing against seized rollers.
- Belt Stretch from excessive belt tensioning, from belt aging, from high product impact, from overloading with product, from running the belt beyond belt design speed, from too much stop-start inertia forces.
- Belt distortion due to out-of-square joining, due to a join being too thick, due to ripping and buckling within the belt material as internal fibres tear because of overloads, due to loading one side of the belt.
- Bad tracking due to head pulley misalignment, due to no head pulley crowning, due to trough and return roller misalignment, due to roller seizure producing more drag. Also can be due to the last upper roller being too close to the head pulley and lifting the belt so it makes first contact far around on the head pulley circumference.
- Gearbox/drive mounting deflection causing shaft misalignment by support frame and load carrying members being undersized and insufficiently braced for the operating forces and inertia force changes.
- Cut belts from impact of product, from dragging across jammed sharp objects, from tearing due to sudden overloads, from bolts and foreign metal objects gouging.
- Scrapper failure from product build-up on the scrapping edge, from jammed scrapper parts, from wrong set-up.
- Slipping belt due to product jam, due to loss of belt tension, due to dust/dirt/moisture under head drum.
Proper Belt Conveyor Set-Up and Use
Become familiarised with the manufacturers recommended operating practice and then get operators and maintainers together to discuss how to achieve them in-house.
In the simplest of ways decide how to:
- Make sure the belt is tracking properly and to detect when it is going off-track. Crown the pulleys (1% to 1.5% of the pulley width), align guide and troughing rollers square to the belt, on short conveyors insure the head and tail drum centers are aligned to within 0.25 millimeter. Keep guide rollers and pulleys clean of product build-up.
- Make sure the scrapper is working well. If necessary change designs. Maybe water jet spray instead of a solid edge scrapper. (Be wary of brush scrappers for powdered and damp products. Fine particles build up in the bristles and clog the entire brush making the bristles rigid and stiff, which then scratches the belt.)
- Prevent overloading product by slowing loading rates to below removal rates. Install deflection plates in loading chutes to take the momentum of falling product and stop it from pounding into the belt. Install more rollers in the loading section to distribute the pounding forces.
- Prevent product jams.
- Keep friction low by detecting and replacing seized rollers. Reduce transfer station skirt-to-belt contact. If dust is a problem keep skirt contact area and pressures low enough to minimise the amount of dust escape. Higher pressures force the skirt hard into the belt and both parts wear.
When you sort the issues out write down how it was done and make them standard operating procedure so the discoveries are not lost.
Mike Sondalini – Equipment Longevity Engineer
References: Applied Mechanics, A K Hosking, M R Harris, H & H Publishing.
If you found this interesting, you may like the ebook Process Control Essentials.
Leave a Reply