What readers will learn in this article:
- Bolts and studs behave like springs when loads are applied.
- Gaskets behave like springs when loads are applied
- Introduced to the use of force diagrams to explain and analyze bolt and gasket behavior.
- Bolt torque-up issues and considerations.
- The effects of thread surface finish on friction.
- Proper bolting practices, sequence, and methods.
A bolt is not a bolt
A bolt is not a bolt – it is a spring! When tightening a bolt you are tensioning or slackening a spring. The sketches In Figure No. 1 show how a spring can be considered to replace the bolt pulling the flanges together.
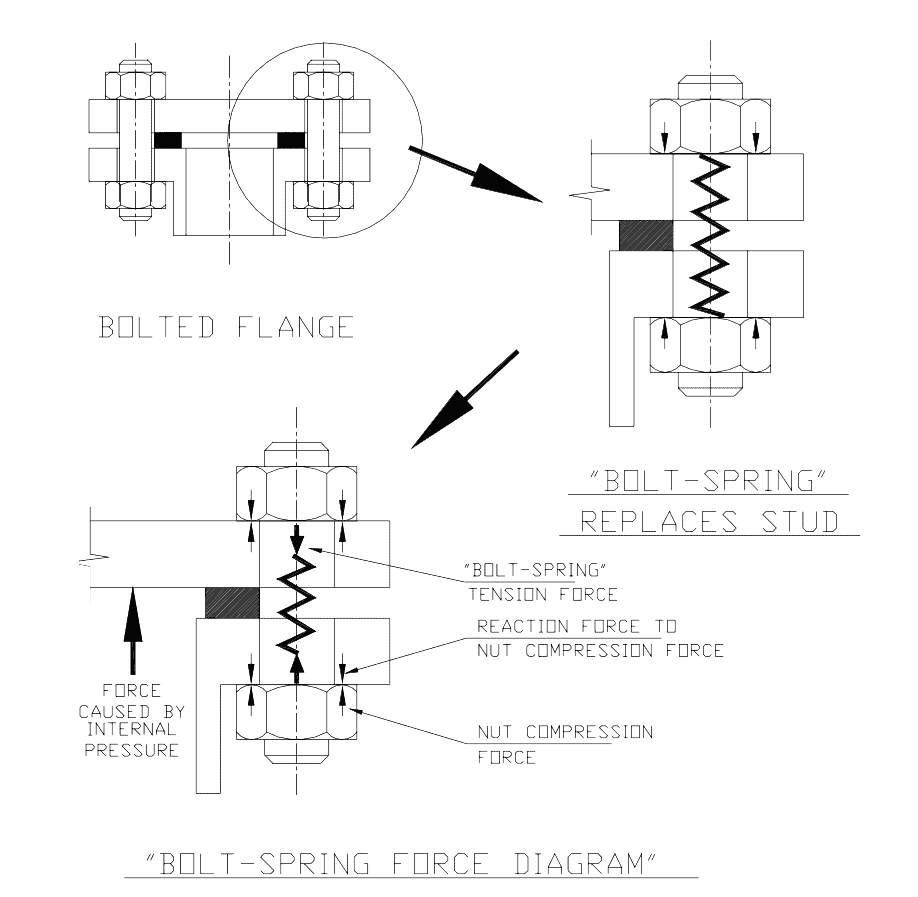
Figure No. 1. The Forces Acting on a ‘Bolt-Spring’
In this article, a bolt is referred to as a ‘bolt-spring’.
The ‘bolt- spring’ force must pull the flanges together more than the forces acting to push them apart. If the ‘bolt-spring’ is too loose, the pressure stretches the bolt and the flange opens and leaks. To prevent the flanges separating, the bolts are preloaded (stretched). Bolt torque figures are calculated to produce a bolt stretched to at least 65% of its yield strength.
Yield strength is the stress at which the bolt shank starts to stretch (Take it beyond this & it will snap).
A gasket is not a gasket
When a gasket is sandwiched between flanges it behaves both as a seal and as a spring. Figure No. 2 shows the gasket behaving as a spring-like material exerting its own reactive force. In this article it will be referred to as a ‘gasket-spring’.
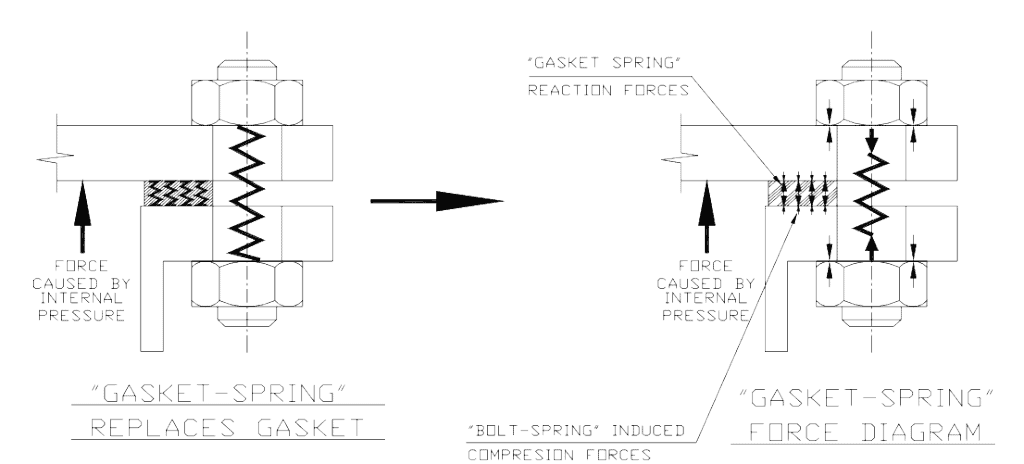
Figure No. 2. The Forces Acting on a ‘Gasket-Spring’
A ‘gasket-spring’ will creep (squash) with time or temperature.
Gasket creep is the gradual loss of the gasket’s ‘springiness’. The spring tension in the gasket slackens off. Gasket creep may require that flanges be re-tensioned periodically. It is often necessary to check both the bolt AND the gasket manufacturer’s torque tables to select the highest allowable torque to be used.
When rubber, cork or similar soft gaskets are used the bolts can no longer be stretched to clamp the gasket in place. If the bolts are tightened the soft gasket squeezes out. When using soft gaskets only the ‘spring’ properties of the gasket material do the sealing. Soft gaskets must only be used for low-pressure applications.
Usually, an adhesive is put on the faces of the gasket to mechanically bond them to the flange faces and reduce the chance of leakage.
To prevent a flange leak there are a few things to check. The following table will provide some guidance.
What is required
- The bolt-spring shaft ought to be stretched to 75% – 80% of the material yield and in excess of the maximum bolt load.
- Bolts of sufficient tensile strength to take the process and bolting forces.
- Bolt tension must allow for cycling of loads, shock loads, shear loads and vibration.
- When pulling up bolts try to apply the torque evenly and continuously.
- Clean, flat flange faces
- Use washers under the bolt head and nut.
- The gasket must be suitable to retain the pipe contents and have negligible gasket creep.
- Cut a neat, close tolerance gasket to completely cover the flange pressure face.
What you can do
Ask the bolt manufacturer for the maximum bolt torque and the number of turns from snug to achieve this or use load indicating washers.
As a last resort use a top quality tension wrench to the bolt manufacturer’s torque specification. Check the bolt head forging marks against the bolt head manufacturer’s standards to ensure the bolts and nuts meet the load requirements for the service.
Swap the bolt for one of higher tensile strength and pull it up tighter. Make sure all the bolts are to the same rating and diameter. Lubricate the bolt threads lightly and follow the recommended bolting-up sequence.
Check both flanges are clean and flat. Put a steel straight edge across each face and make sure they are flat. Machine flange faces that are not flat and leave enough thickness to still comply with pressure code requirements.
The washer acts to distribute the load evenly and remove the effect of high spots under the head or nut causing uneven bearing.
Chose the thinnest gasket possible with high seating pressure requirements. Use new gaskets as old gaskets have lost their ‘spring’. A gasket must completely cover the pressure faces to ensure the flange loading evenly squeezes the gasket.
Tightening the bolt and nut
Tightening bolts by ‘feel’ is the most inaccurate method to use.
Because everyone has a different ‘feel’ the likelihood of error is 35%. Using a torque wrench has a 25% error. A number of turns from snug a 15% error. Load indicating washers have a 10% error. Measuring change in bolt length has 5% error. Measuring bolt stress is the most accurate method with a 1% error.
Figure No. 3 gives you an idea of how to gauge torque. Torque is the measure of twist produced by a force applied at a perpendicular distance from the point of twist. The sketch shows an 80-kg man standing on a one-meter long horizontal bolt spanner.
This man is applying about an 800 Newton meter (Nm) torque (80 kg x 10 m/sec2 = 800 Nm). But this is at sea level under full gravity, in outer space, where the man would have no weight, he could not apply a torque by this method. If the spanner were 500 mm long (half the previous length) the torque would be 400 Nm and if it were 300 mm long, the torque would be about 250 Nm.

Figure No. 3. Torque on a Nut
The assembly torque that is recommended for high tensile 20- mm bolts to give 75% yield stress is about 550 Nm. A man tightening a 20-mm diameter flange bolt with a 300-mm, or even a 450-mm, long spanner would probably not generate enough force to tension the bolts.
On bolts of 20 mm diameter and larger, depending on the pressure in the pipe and the type of gasket, it may be necessary to use an extension arm on the spanner or a hydraulic nut tensioner to get the needed torque.
Bolt thread surface finish
The surface finish of the bolt and nut threads also affects the amount of torque needed to preload (stretch) the bolt.
A dry galvanized bolt thread produces more friction between bolt and nut than one that is nicely machined and oiled. For the same applied torque, tightening-up dry galvanized threads would give less stretch in the bolt than tightening up a machined and oiled thread. Tables are available that give factors by which to increase or decrease the manufacturer’s recommended bolting- up torque.
They vary from 2.1 for a dry galvanized thread to 0.7 for a nicely machined and oiled thread.
Bolting-up sequence
The drawing in Figure No. 4 of blank flanges with flange bolt- holes shows the sequence to adopt when doing up flanges.
Lightly lubricate the bolt threads after deburring them. Insert the bolts into the flange holes and start by pulling up all bolts finger tight. Then in the order shown, pull-up the bolts to half torque, again in the order shown, pull-up the bolts to the final torque, finally go back over all the bolts, in the order shown, and re-torque them again to the final torque to confirm all are correct.
This method will sandwich in place and load up the ‘gasket-spring’ evenly.
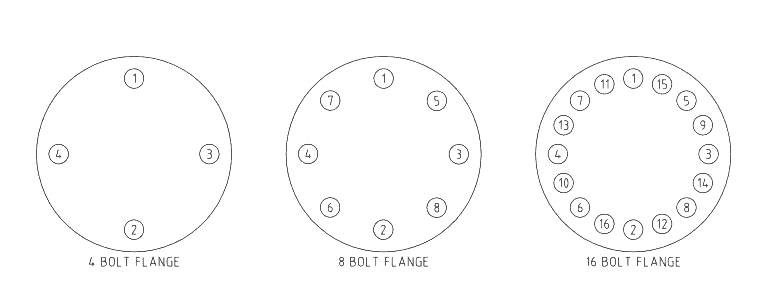
Figure No. 4. Flange Bolt Tightening Sequence
Mike Sondalini – Maintenance Engineer
DISCLAIMER: Because the authors, publisher and resellers do not know the context in which the information presented in the articles is to be used, they accept no responsibility for the consequences of using the information.
If you found this interesting, you may like the ebook Centrifugal Pump Problems & Answers.
Thanks Fred, this one of my favorites. Funny story: I once post an excerpt to Reddit’s mechanical engineering forum in what i thought would be interesting to the industry in general, that a bolt is a spring. They slammed me pretty good as they where experts in mechanical engineering and this was old news for them. ha ha But short of being a mechanical engineer, I think maintenance, students and others in the reliability field will like your post as much as I. Thanks again.
Thanks for the note and story Don. The basics are good to know as a foundation for a reliability program. cheers, Fred
Interesting article! Main take for an engineer working with microelectronics is that it helps to take a systematic approach with calculations and measurements (if possible) to ensure that your system works as planned.
One note: 80kg x 10m/s2 ~800N. You need to multiply this with the shaft length (1m) to get the torque of 800Nm as is correctly indicated later.
Hi Petri, thanks for the read and comment. I’ll take a look at making the calculation clearer. cheers, Fred